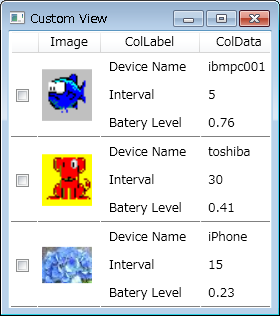
C#でListViewを使って、フォーマットされた表示を行おうとするのですが、どうにも思うように行きません。
単純なExcelのような表は簡単にできても、ヤフオクの一覧のようなフォーマットされた情報が列挙される表示は、色々こねくり回す必要があるようです。
一番参考になったのはこちらのサイト。
How to Create a Custom View Mode for a ListView
普通にMSDNですが、そこに添付されていたサンプルがまさにやりたいことでした。
ページの内容を読み、画面下部のリンクからサンプルをダウンロードします。
サンプルのままでは、各データの境界に線が無いので、以下のページを参考にTemplateをカスタマイズします。
ListViewのGridViewに罫線を引きたい
そうすると、こんな感じに表示することができます。
それではソースを見ていきましょう。
MainWindow.xaml
  1
  2
  3
  4
  5
  6
  7
  8
  9
 10
 11
 12
 13
 14
 15
 16
 17
 18
 19
 20
 21
 22
 23
 24
 25
 26
 27
 28
 29
 30
 31
 32
 33
 34
 35
 36
 37
 38
 39
 40
 41
 42
 43
 44
 45
 46
 47
 48
 49
 50
 51
 52
 53
 54
 55
 56
 57
 58
 59
 60
 61
 62
 63
 64
 65
 66
 67
 68
 69
 70
 71
 72
 73
 74
 75
 76
 77
 78
 79
 80
 81
 82
 83
 84
 85
 86
 87
 88
 89
|
| <Window x:Class="ListViewCustomView.MainWindow"
xmlns="http://schemas.microsoft.com/winfx/2006/xaml/presentation"
xmlns:x="http://schemas.microsoft.com/winfx/2006/xaml"
Title="Custom View"
Width="400" Height="200"
>
<Window.Resources>
<DataTemplate x:Key="checkbox">
<CheckBox IsChecked="{Binding IsSelected,RelativeSource={RelativeSource AncestorType=ListViewItem} }" Margin="0,1,1,1" />
</DataTemplate>
<DataTemplate x:Key="DisplayImage">
<StackPanel Width="50">
<Image Source="{Binding Image}"/>
</StackPanel>
</DataTemplate>
<DataTemplate x:Key="ColLabel">
<TextBlock>
<Label Content="Device Name"/>
<LineBreak />
<Label Content="Interval"/>
<LineBreak />
<Label Content="Batery Level"/>
</TextBlock>
</DataTemplate>
<DataTemplate x:Key="ColData">
<TextBlock>
<Label Content="{Binding DeviceName}"/>
<LineBreak />
<Label Content="{Binding Interval}"/>
<LineBreak />
<Label Content="{Binding BatteryLevel}"/>
</TextBlock>
</DataTemplate>
<GridView x:Key="gridView">
<GridViewColumn CellTemplate="{StaticResource checkbox}"/>
<GridViewColumn Header="Image" CellTemplate="{StaticResource DisplayImage}"/>
<GridViewColumn Header="ColLabel" CellTemplate="{StaticResource ColLabel}"/>
<GridViewColumn Header="ColData" CellTemplate="{StaticResource ColData}"/>
</GridView>
<Style x:Key="lineGridStyle" TargetType="{x:Type ListViewItem}">
<Setter Property="HorizontalContentAlignment" Value="Stretch" />
<Setter Property="Template">
<Setter.Value>
<ControlTemplate TargetType="{x:Type ListViewItem}">
<!-- まず、元の見た目を再現 -->
<Grid Name="background">
<ContentControl Name="foreground">
<!-- バインドするために名前をつけた -->
<GridViewRowPresenter Name="rowPresenter"/>
</ContentControl>
<!-- GridViewRowPresenterのColumnsとバインド! -->
<ItemsControl ItemsSource="{Binding ElementName=rowPresenter, Path=Columns}">
<!-- 表示は水平方向に -->
<ItemsControl.ItemsPanel>
<ItemsPanelTemplate>
<StackPanel Orientation="Horizontal" />
</ItemsPanelTemplate>
</ItemsControl.ItemsPanel>
<!-- ボーダーを表示する -->
<ItemsControl.ItemTemplate>
<DataTemplate>
<!-- 右側と下側に罫線を引く、ボーダーの幅は列の表示幅にバインドする -->
<Border Margin="1,0,0,0"
BorderBrush="Gray"
BorderThickness="0,0,0,1"
Width="{Binding ActualWidth}"/>
</DataTemplate>
</ItemsControl.ItemTemplate>
</ItemsControl>
</Grid>
</ControlTemplate>
</Setter.Value>
</Setter>
</Style>
</Window.Resources>
<StackPanel>
<ListView Name="lv" ItemsSource="{Binding}" FontSize="12" View="{Binding gridView}" ItemContainerStyle="{StaticResource lineGridStyle}" />
</StackPanel>
</Window>
|
<Window.Resources>の<DataTemplate>で各要素を定義し、<GridView>で表示フォーマットを定義しています。
<Style>以降は境界線を引くためのものです。詳細は上記リンク先を参照してください。
実際のデータ表示本体は、
  1
  2
  3
|
| <StackPanel>
<ListView Name="lv" ItemsSource="{Binding}" FontSize="12" View="{Binding gridView}" ItemContainerStyle="{StaticResource lineGridStyle}" />
</StackPanel>
|
だけです。
ItemsSource="{Binding}"とすることで、暗黙的にDataContextのデータがバインドされます。
次にソース。
MainWindow.xaml.cs
  1
  2
  3
  4
  5
  6
  7
  8
  9
 10
 11
 12
 13
 14
 15
 16
 17
 18
 19
 20
 21
 22
 23
 24
 25
 26
 27
 28
 29
 30
 31
 32
 33
 34
 35
 36
 37
 38
 39
 40
 41
 42
 43
 44
 45
 46
 47
 48
 49
 50
 51
 52
 53
 54
 55
 56
 57
 58
 59
 60
 61
 62
 63
 64
 65
 66
|
-
-
|
|
!
-
|
|
-
|
|
|
|
|
|
|
!
|
|
-
|
-
|
!
|
!
|
-
|
|
|
|
|
|
!
|
-
|
-
|
|
!
|
-
|
|
!
|
-
|
|
!
|
-
|
|
!
!
|
!
!
| using System.Windows;
using System.Windows.Controls;
using System.Collections.Generic;
namespace ListViewCustomView
{
public partial class MainWindow : Window
{
public MainWindow()
{
InitializeComponent();
ChangeView("GridView");
List dispInformations = new List();
dispInformations.Add(makeInformationsSub("ibmpc001", 5, 0.76f, "images\\fish.png"));
dispInformations.Add(makeInformationsSub("toshiba", 30, 0.41f, "images\\dog.png"));
dispInformations.Add(makeInformationsSub("iPhone", 15, 0.23f, "images\\flower.jpg"));
this.DataContext = dispInformations;
}
void ChangeView(string str)
{
if (str == "GridView")
{
lv.View = lv.FindResource("gridView") as ViewBase;
}
}
private DispInformation makeInformationsSub(string dn, int iv, float ll, string im) {
DispInformation di = new DispInformation();
di.DeviceName = dn;
di.Interval = iv;
di.BatteryLevel = ll;
di.Image = im;
return di;
}
public class DispInformation {
private string devicename;
public string DeviceName {
get { return devicename; }
set { devicename = value; }
}
private int interval;
public int Interval {
get { return interval; }
set { interval = value; }
}
private float batterylevel;
public float BatteryLevel {
get { return batterylevel; }
set { batterylevel = value; }
}
private string image;
public string Image {
get { return image; }
set { image = value; }
}
}
}
}
|
サンプルにはこれ以外にも色々入っていますが、Viewの切り替えをしなければ画像ファイルを除いて全て不要です。
本当はChangeView()も不要だと思うのですが、うまく取れませんでした。
要は、データを格納したいclassをListに詰め込んでDataContextに入れてあげれば良いようです。
ミソは以下の部分で、こういう形に書いてあげないとListViewに反映されませんでした。
  1
  2
  3
  4
  5
  6
  7
|
-
|
|
!
| :
private string devicename;
public string DeviceName {
get { return devicename; }
set { devicename = value; }
}
:
|
ここまでたどり着くのにやっぱり2日ぐらいかかったので、メモ。
昔懐かしいバインダー。
結構高いんですね。
これがいい、っていう人がいるのかな。
XAMLのバインドもこれぐらい簡単だったらいいのに・・・。
|
|


